RESOLUTION
We require all submitted files to have a resolution of 300 DPI (dots per inch). If you print a design under 300 DPI, it will turn out fuzzy and almost unreadable.
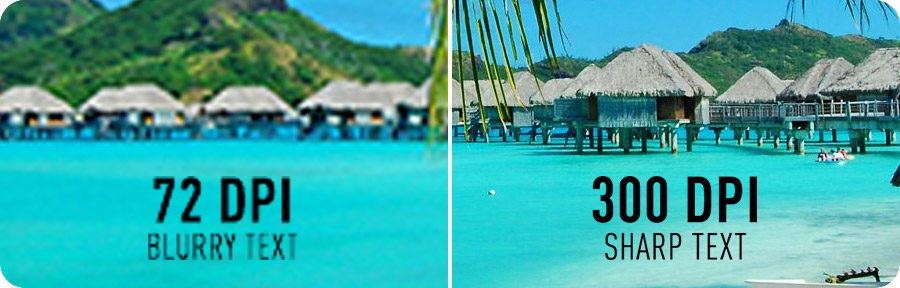
Interpolation: Most images taken from web pages are 72 DPI, when enlarged using graphics software it will "interpolate" and resemble the left side of the image.
Interpolation is adding pixels by sampling the color of surrounding pixels.
BLEED & TRIM
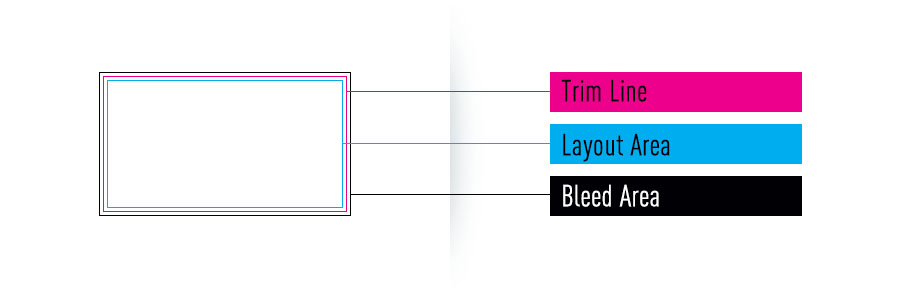
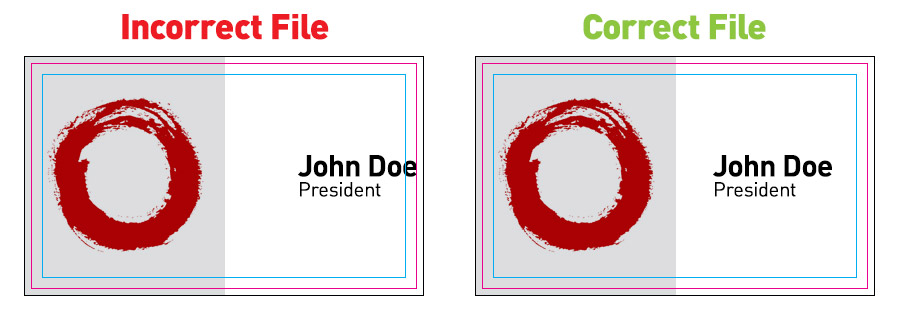
Trim Line: The trim line is the acutal size of the final product. When your design is printed, the trim line will become the edge of your piece.
Layout Area: Your layout area starts 1/8" inside the trim line. The layout area is the space where it is "safe" to put your design, content and type.
Bleed Area: For each print job, 1/16" on all sides of the design will be trimmed off. This is called the bleed. Make sure you do not have any important text in this area.
COLOR
RGB vs. CMYK
Most businesses have both print and digital needs. You might want to use the logo from your website on a t-shirt or print a new product brochure. RGB (Red, Green, and Blue) is the color mode used in television, scanners, digital cameras, and computer monitors. Commercial printing presses print in CMYK (Cyan, Magenta, Yellow, and K for black). When you are moving from one realm to the other, it is important to convert your color model. RGB colors will not come out true when converted for print because CMYK printing cannot produce the same range of colors.
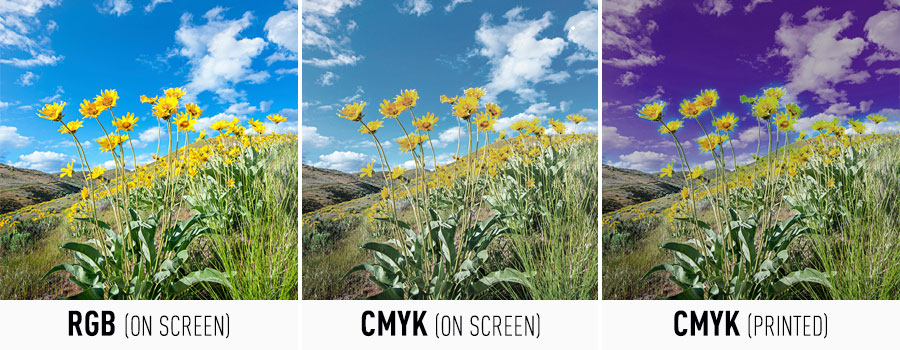
If its going to stay on your computer, tv, or website, it needs to be in RGB. If its going to print, it needs to be CMYK. Bright and vibrant colors that you see in RGB, simply cannot be replicated with standard CMYK inks. When selecting colors for your print project, it is best to use CMYK color builds to avoid potential RGB conversion issues.
By always choosing the correct color model for each application, you can make sure that your graphics look great on paper and on the screen.
Common issue: Programs translate bright blue in RGB into a purple color in CMYK.
Black vs. Rich Black
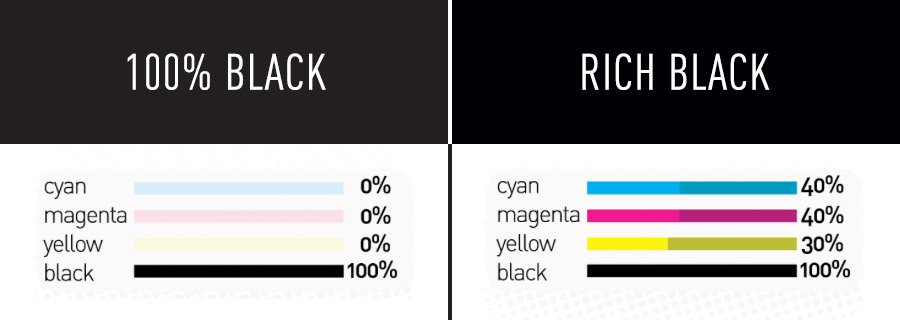
100% Black: 100% black is recommended for smaller text.
Rich Black: Great for solid black areas and text over 36 pt. to prevent color from looking gray.
RECOMMENDED RICH BLACK FOR MEDIA WALLS, FABRIC BANNERS, ALL FLAGS, CANOPY TENTS, AND TABLE THROWS: C-100% M-100% Y-100% K-100%
SPOT UV, EMBOSSING, DEBOSSING, FOILING
If you are ordering one of our speciality products or print finishes, you will need to set up your design files appropriately for this.
File setup for these print finishes can be a complex process and should be completed by an experienced designer. If you would like the Smart Levels Media Design Department to create your Spot UV design, please request Design Services.
Several products use the same setup process below, including:
- Spot UV
- Embossing
- Debossing
- Foiling
Example
In the following article, we will use setup separations for the Spot UV business card shown below - note the Spot UV glossiness over the owl illustration on the front, and the stripes on the back in Spot UV.
Step 1 : CMYK Files
Follow the guidelines for setting up regular CMYK files. Some products (such as Premium Black) will not have CMYK files - if ordering one of those products, you may skip this step.
Export a press-ready PDF file for the front and back CMYK printing of the card, front and back. These files should have "Front" and "Back" at the end of the file name (for the front and back respectively). These files will not include any details for the additional print treatment.
Example : 123456-1_Front.pdf & 123456-1_Back.pdf
Step 2 : Define Separations/s
For this step, we will create a black and white file for the separation. This can be done in many ways in your design program - by setting up new layers, defining a new artboard (new page) or creating a separate file.
The areas for treatment (spot UV, foil, emboss etc.) will need to be defined in black ink, and areas for no treatment will be white. The black color used must be CMYK Black only - with no grey colors, or other inks.
For the best outcome, and easiest process, we recommend creating the design in vector-format (such as in Illustrator or InDesign). Creation in a pixel-based format (such as Photoshop) is possible in the same manner, but can become difficult.
K100 Black
CMYK : 0, 0, 0, 100
Step 3 : Export Separation
We suggest double-checking the alignment of the separation to the original CMYK artwork (created in the previous step) before proceeding.
Export each separation as a press-ready PDF file. Use the following naming conventions for your files:
| Type |
File Name |
Example |
| Spot UV |
UV |
123456-1_Front_UV.pdf |
| Emboss |
EMBOSS |
123456-1_Front_EMBOSS.pdf |
| Deboss |
DEBOSS |
123456-1_Front_DEBOSS.pdf |
| Foiling |
FOIL_(color) |
123456-1_Front_FOIL_Gold.pdf |
Each different treatment will need to be defined in a different separation file. For example, if you are setting up two orders for Spot UV, you will need a UV file. For orders with multiple jobs, use the same naming convention but change the job number as appropriate (ie. "123456-2_Front.pdf", "123456-2_Back.pdf" etc.).
If you are only ordering a treatment on one side of your card, only supply the front file for UV, EMBOSS, DEBOSS or FOIL (ensure any corresponding CMYK artwork is also set up on the Front.pdf file).
Example : 123456-1_Front_UV.pdf & 123456-1_Back_UV.pdf
Example
For this example, there are eight files generated :
- 123456-1_Front.pdf (front design file)
- 123456-1_Front_UV.pdf (front spot UV file)
- 123456-1_Back.pdf (back design file)
- 123456-1_Back_UV.pdf (back spot UV file)
- 123456-2_Front.pdf (front design file)
- 123456-2_Front_UV.pdf (front spot UV file)
- 123456-2_Back.pdf (back file)
- 123456-2_Back_UV.pdf (back spot UV file)
Step 4 : Compress your files
When you have all the files for the front of one job ready, go ahead an put them in a folder and zip/stuff them to compress them into 1 file. Do the same with the back. Upload these files for your 'front' and your 'back' files. Each job number will have their own files for the fronts and backs. Job 123456-1 will have files uploaded for the front and back, and job 123456-2 will have its own files uploaded for the front and back.
Step 5 : Upload to order
Ensure you upload all the files into your order for printing.
DIE CUT
Example
For this example, we are using a custom size 5.5" x 10.5" hang card. We add .125" around for the bleed
Step 1 : Setting up your file
First, place your completed arwork into a layer.
Step 2 : Create your die line
Next, we'll start on your die line. Create a new layer called 'DIE LINE'. The Die Line should be the only thing on this layer. Use the Pen Tool or shapes to make your die line. Whichever method you choose, as long as the resulting shape is vector, you shouldn't have any problems.
Step 3 : Path Preparation
Make sure that the stroke of your path is set to 1pt and that it uses a bold color that can easily be seen on top of the artwork (such as 100% cyan or magenta). ALL OF THE COLOR ON THE DIE LINE SHOULD BE 100% OF THE SAME COLOR.
Step 4 : File preparations
Go ahead and Save as, or Export your design layers. When those layers are done and ready, go ahead and hide ALL the layers, except for the DIE LINE. This should be the only layer visible. Go ahead and export this layer, and include DIE LINE in the name. Ex. 123456_front_dieline.pdf.
Step 5 : Upload your artwork
Now that your files are all done, you should have 2 sets of files. The design files (1 for single sided, and 2 for double sided), plus the die line. Go ahead and upload these. You will be contacted with a Customer Service Rep should there be any problems.